This notebook was prepared by Donne Martin. Source and license info is on GitHub.
Amazon Web Services (AWS)
SSH to EC2
Boto
S3cmd
s3-parallel-put
S3DistCp
Redshift
Kinesis
Lambda
SSH to EC2
SSH to an Ubuntu EC2 Instance
The ssh -i command connects to an EC2 instance using a PEM key file for authentication instead of a password. Ubuntu AMIs use ubuntu as the default username. The PEM file must have restricted permissions (chmod 400 key.pem) or SSH will refuse to use it. EC2 instances are the fundamental compute building blocks in AWS – they run your training jobs, web servers, and data processing pipelines.
!ssh -i key.pem ubuntu@ipaddress
SSH to an Amazon Linux EC2 Instance
Amazon Linux AMIs use ec2-user as the default username instead of ubuntu. The connection process is identical – you specify the PEM key file and the instance’s public IP address. Amazon Linux is optimized for EC2 with pre-installed AWS CLI tools and performance tuning, making it a popular choice for production workloads on AWS.
!ssh -i key.pem ec2-user@ipaddress
Boto
Boto is the official AWS SDK for Python.
Install Boto:
!pip install Boto
Configuring Boto Credentials
Boto reads AWS credentials from a ~/.boto configuration file containing your access key and secret key. These credentials authenticate every API call to AWS services. Security best practice: use IAM user credentials with minimal permissions rather than root account keys, and never commit this file to version control. Modern AWS SDKs (boto3) also support credential profiles, environment variables, and IAM roles on EC2 instances.
aws_access_key_id = YOURACCESSKEY
aws_secret_access_key = YOURSECRETKEY
Connecting to S3 with Boto
boto.connect_s3() establishes a connection to Amazon S3 using the credentials from your ~/.boto config file. S3 (Simple Storage Service) is the primary object storage service in AWS, commonly used for storing datasets, model artifacts, logs, and backups. The connection object provides methods for listing buckets, creating/deleting buckets, and managing objects within them.
import boto
s3 = boto.connect_s3()
Connecting to EC2 with Boto
boto.ec2.connect_to_region() creates a connection to the EC2 service in the specified AWS region. EC2 operations are region-specific, so you must connect to the region where your instances are running. Through this connection, you can programmatically launch, stop, terminate instances, manage security groups, and query instance metadata – enabling infrastructure automation and auto-scaling logic in your Python applications.
import boto.ec2
ec2 = boto.ec2.connect_to_region('us-east-1')
S3 Bucket and Object Operations with Boto
This example demonstrates the complete lifecycle of working with S3 objects: creating a globally-unique bucket, uploading a key-value pair, retrieving its contents, and cleaning up by deleting both the object and the bucket. Note the time.sleep(2) for S3 eventual consistency – after writing, there is a brief window where reads may return stale data. Modern S3 (since December 2020) provides strong read-after-write consistency, but this pattern remains common in legacy code.
import boto
import time
s3 = boto.connect_s3()

# Create a new bucket. Buckets must have a globally unique name (not just
# unique to your account).
bucket = s3.create_bucket('boto-demo-%s' % int(time.time()))

# Create a new key/value pair.
key = bucket.new_key('mykey')
key.set_contents_from_string("Hello World!")

# Sleep to ensure the data is eventually there.
# This is often referred to as "S3 eventual consistency".
time.sleep(2)

# Retrieve the contents of ``mykey``.
print key.get_contents_as_string()

# Delete the key.
key.delete()

# Delete the bucket.
bucket.delete()
Each service supports a different set of commands. Refer to the following for more details:
S3cmd
Before I discovered S3cmd, I had been using the S3 console to do basic operations and boto to do more of the heavy lifting. However, sometimes I just want to hack away at a command line to do my work.
I’ve found S3cmd to be a great command line tool for interacting with S3 on AWS. S3cmd is written in Python, is open source, and is free even for commercial use. It offers more advanced features than those found in the AWS CLI.
Installing S3cmd
S3cmd is installed via apt-get on Debian/Ubuntu systems. After installation, it provides a single s3cmd binary that supports dozens of S3 operations. S3cmd is particularly useful in shell scripts and automation workflows where you need to interact with S3 from the command line without writing Python code.
!sudo apt-get install s3cmd
Running the following command will prompt you to enter your AWS access and AWS secret keys. To follow security best practices, make sure you are using an IAM account as opposed to using the root account.
I also suggest enabling GPG encryption which will encrypt your data at rest, and enabling HTTPS to encrypt your data in transit. Note this might impact performance.
!s3cmd --configure
Common S3cmd Operations
These commands cover the most frequently used S3 operations: listing buckets and their contents, uploading files (with public/private ACL options), downloading files, deleting files and buckets, creating buckets, checking disk usage, and syncing directories. The sync command is especially powerful for maintaining mirrors between local storage and S3, as it only transfers files that have changed. The --dry-run flag lets you preview what will happen without making any changes.
# List all buckets
!s3cmd ls

# List the contents of the bucket
!s3cmd ls s3://my-bucket-name

# Upload a file into the bucket (private)
!s3cmd put myfile.txt s3://my-bucket-name/myfile.txt

# Upload a file into the bucket (public)
!s3cmd put --acl-public --guess-mime-type myfile.txt s3://my-bucket-name/myfile.txt

# Recursively upload a directory to s3
!s3cmd put --recursive my-local-folder-path/ s3://my-bucket-name/mydir/

# Download a file
!s3cmd get s3://my-bucket-name/myfile.txt myfile.txt

# Recursively download files that start with myfile
!s3cmd --recursive get s3://my-bucket-name/myfile

# Delete a file
!s3cmd del s3://my-bucket-name/myfile.txt

# Delete a bucket
!s3cmd del --recursive s3://my-bucket-name/

# Create a bucket
!s3cmd mb s3://my-bucket-name

# List bucket disk usage (human readable)
!s3cmd du -H s3://my-bucket-name/

# Sync local (source) to s3 bucket (destination)
!s3cmd sync my-local-folder-path/ s3://my-bucket-name/

# Sync s3 bucket (source) to local (destination)
!s3cmd sync s3://my-bucket-name/ my-local-folder-path/

# Do a dry-run (do not perform actual sync, but get information about what would happen)
!s3cmd --dry-run sync s3://my-bucket-name/ my-local-folder-path/

# Apply a standard shell wildcard include to sync s3 bucket (source) to local (destination)
!s3cmd --include '2014-05-01*' sync s3://my-bucket-name/ my-local-folder-path/
s3-parallel-put
s3-parallel-put is a great tool for uploading multiple files to S3 in parallel.
Installing s3-parallel-put Dependencies
Before using s3-parallel-put, you need the boto Python library for S3 API access and git to clone the tool’s repository. These system-level package installs ensure the environment has everything needed to compile and run the tool.
!sudo apt-get install boto
!sudo apt-get install git
Cloning the s3-parallel-put Repository
s3-parallel-put is distributed as a GitHub repository. Cloning it gives you the executable Python scripts. The tool uses multiple processes to upload files concurrently, which is dramatically faster than uploading one file at a time when you have thousands of small files to transfer to S3.
!git clone https://github.com/twpayne/s3-parallel-put.git
Configuring AWS Keys for s3-parallel-put
The tool reads AWS credentials from environment variables (AWS_ACCESS_KEY_ID and AWS_SECRET_ACCESS_KEY). Exporting these variables makes them available to all subsequent commands in the shell session. In production, prefer using IAM roles on EC2 instances instead of exporting credentials, as roles provide temporary credentials that rotate automatically.
!export AWS_ACCESS_KEY_ID=XXX
!export AWS_SECRET_ACCESS_KEY=XXX
Basic s3-parallel-put Usage
The --bucket flag specifies the target S3 bucket, --prefix sets the key prefix (virtual directory) in S3, and SOURCE is the local directory containing files to upload. The tool automatically determines the number of parallel upload processes based on available CPUs, dramatically reducing total transfer time compared to sequential uploads.
!s3-parallel-put --bucket=bucket --prefix=PREFIX SOURCE
Dry Run with s3-parallel-put
The --dry-run flag simulates the upload without actually transferring any data, showing you what would be uploaded. The --put=stupid mode skips checking whether files already exist on S3 (faster but may re-upload duplicates). This combination is useful for verifying your command parameters and estimating the scope of the transfer before committing to it.
!s3-parallel-put --bucket=bucket --host=s3.amazonaws.com --put=stupid --dry-run --prefix=prefix/ ./
S3DistCp
S3DistCp is an extension of DistCp that is optimized to work with Amazon S3. S3DistCp is useful for combining smaller files and aggregate them together, taking in a pattern and target file to combine smaller input files to larger ones. S3DistCp can also be used to transfer large volumes of data from S3 to your Hadoop cluster.
Setting Up Ruby for EMR CLI
The EMR command-line interface requires a specific Ruby version. rvm (Ruby Version Manager) lets you switch between Ruby versions without affecting the system Ruby installation. This step ensures compatibility with the EMR CLI tool, which is used to create and manage Elastic MapReduce clusters from the command line.
!rvm --default ruby-1.8.7-p374
The EMR command line below executes the following:
Create a master node and slave nodes of type m1.small
Runs S3DistCp on the source bucket location and concatenates files that match the date regular expression, resulting in files that are roughly 1024 MB or 1 GB
Places the results in the destination bucket
!./elastic-mapreduce --create --instance-group master --instance-count 1 \
--instance-type m1.small --instance-group core --instance-count 4 \
--instance-type m1.small --jar /home/hadoop/lib/emr-s3distcp-1.0.jar \
--args "--src,s3://my-bucket-source/,--groupBy,.*([0-9]{4}-01).*,\
--dest,s3://my-bucket-dest/,--targetSize,1024"
For further optimization, compression can be helpful to save on AWS storage and bandwidth costs, to speed up the S3 to/from EMR transfer, and to reduce disk I/O. Note that compressed files are not easy to split for Hadoop. For example, Hadoop uses a single mapper per GZIP file, as it does not know about file boundaries.
What type of compression should you use?
Time sensitive job: Snappy or LZO
Large amounts of data: GZIP
General purpose: GZIP, as it’s supported by most platforms
You can specify the compression codec (gzip, lzo, snappy, or none) to use for copied files with S3DistCp with –outputCodec. If no value is specified, files are copied with no compression change. The code below sets the compression to lzo:
--outputCodec,lzo
Redshift
Loading CSV Data into Redshift from S3
The COPY command is the most efficient way to load bulk data into Redshift from S3. It parallelizes the load across all compute nodes in the cluster, reading directly from S3 without routing data through the leader node. The credentials clause provides AWS access keys for S3 authentication. For production, use IAM roles instead of embedding keys in queries. The csv option tells Redshift to parse the input as comma-separated values.
copy table_name from 's3://source/part'
credentials 'aws_access_key_id=XXX;aws_secret_access_key=XXX'
csv;
Loading TSV Data into Redshift
Adding delimiter '\t' to the COPY command tells Redshift to parse tab-separated values instead of the default comma delimiter. TSV files are common in data pipelines because tab characters rarely appear in data values, avoiding the quoting complications that commas can cause. The rest of the COPY syntax is identical to CSV loading.
copy table_name from 's3://source/part'
credentials 'aws_access_key_id=XXX;aws_secret_access_key=XXX'
csv delimiter '\t';
Viewing Redshift Load Errors
The stl_load_errors system table records detailed information about every failed COPY command, including the column where the error occurred, the raw value that caused the failure, and the error reason. Querying this table is the first debugging step when a COPY command fails or loads fewer rows than expected.
select * from stl_load_errors;
Running VACUUM on Redshift
VACUUM FULL reclaims disk space from deleted rows and re-sorts data according to the table’s sort key. Redshift uses a columnar storage format where deletes and updates leave behind “ghost rows” that waste space and slow queries. Running VACUUM periodically (or after large bulk deletes) is essential for maintaining query performance in production Redshift clusters.
VACUUM FULL;
Analyzing Table Compression
ANALYZE COMPRESSION examines the data in a table and recommends the optimal column encoding (compression) for each column. Redshift’s columnar storage benefits significantly from compression – it reduces disk I/O and storage costs, often improving query performance by 2-10x. Run this command before creating production tables to choose the best encoding for each column’s data distribution.
analyze compression table_name;
Canceling a Running Query
CANCEL terminates a specific running query identified by its process ID (PID). You can find PIDs by querying STV_RECENTS or STV_INFLIGHT. This is useful for killing runaway queries that consume excessive resources or have been running longer than expected, protecting the cluster’s performance for other users.
cancel 18764;
The CANCEL command will not abort a transaction. To abort or roll back a transaction, you must use the ABORT or ROLLBACK command. To cancel a query associated with a transaction, first cancel the query then abort the transaction.
If the query that you canceled is associated with a transaction, use the ABORT or ROLLBACK. command to cancel the transaction and discard any changes made to the data:
abort;
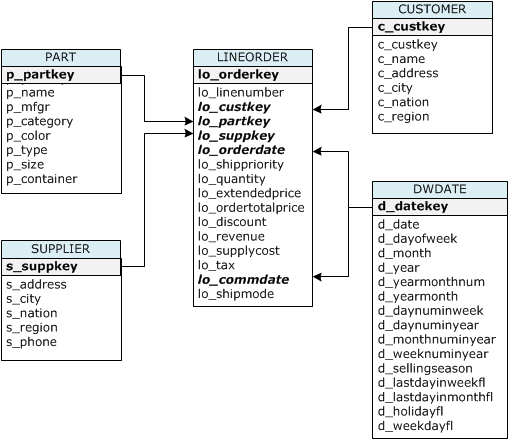
Redshift Table Design Reference
The table definitions below demonstrate key Redshift design concepts: sort keys (optimize range queries and joins), distribution keys (control how rows are distributed across nodes), and distribution styles (KEY, ALL, EVEN). The star schema design uses a large fact table (lineorder) distributed by key with dimension tables distributed as ALL (replicated to every node), which minimizes data movement during joins.
CREATE TABLE part (
  p_partkey             integer         not null        sortkey distkey,
  p_name                varchar(22)     not null,
  p_mfgr                varchar(6)      not null,
  p_category            varchar(7)      not null,
  p_brand1              varchar(9)      not null,
  p_color               varchar(11)     not null,
  p_type                varchar(25)     not null,
  p_size                integer         not null,
  p_container           varchar(10)     not null
);

CREATE TABLE supplier (
  s_suppkey             integer        not null sortkey,
  s_name                varchar(25)    not null,
  s_address             varchar(25)    not null,
  s_city                varchar(10)    not null,
  s_nation              varchar(15)    not null,
  s_region              varchar(12)    not null,
  s_phone               varchar(15)    not null)
diststyle all;

CREATE TABLE customer (
  c_custkey             integer        not null sortkey,
  c_name                varchar(25)    not null,
  c_address             varchar(25)    not null,
  c_city                varchar(10)    not null,
  c_nation              varchar(15)    not null,
  c_region              varchar(12)    not null,
  c_phone               varchar(15)    not null,
  c_mktsegment          varchar(10)    not null)
diststyle all;

CREATE TABLE dwdate (
  d_datekey            integer       not null sortkey,
  d_date               varchar(19)   not null,
  d_dayofweek          varchar(10)   not null,
  d_month              varchar(10)   not null,
  d_year               integer       not null,
  d_yearmonthnum       integer       not null,
  d_yearmonth          varchar(8)    not null,
  d_daynuminweek       integer       not null,
  d_daynuminmonth      integer       not null,
  d_daynuminyear       integer       not null,
  d_monthnuminyear     integer       not null,
  d_weeknuminyear      integer       not null,
  d_sellingseason      varchar(13)   not null,
  d_lastdayinweekfl    varchar(1)    not null,
  d_lastdayinmonthfl   varchar(1)    not null,
  d_holidayfl          varchar(1)    not null,
  d_weekdayfl          varchar(1)    not null)
diststyle all;

CREATE TABLE lineorder (
  lo_orderkey               integer     not null,
  lo_linenumber         integer         not null,
  lo_custkey            integer         not null,
  lo_partkey            integer         not null distkey,
  lo_suppkey            integer         not null,
  lo_orderdate          integer         not null sortkey,
  lo_orderpriority      varchar(15)     not null,
  lo_shippriority       varchar(1)      not null,
  lo_quantity           integer         not null,
  lo_extendedprice      integer         not null,
  lo_ordertotalprice    integer         not null,
  lo_discount           integer         not null,
  lo_revenue            integer         not null,
  lo_supplycost         integer         not null,
  lo_tax                integer         not null,
  lo_commitdate         integer         not null,
  lo_shipmode           varchar(10)     not null
);
Table name |
Sort Key |
Distribution Style |
|---|---|---|
LINEORDER |
lo_orderdate |
lo_partkey |
PART |
p_partkey |
p_partkey |
CUSTOMER |
c_custkey |
ALL |
SUPPLIER |
s_suppkey |
ALL |
DWDATE |
d_datekey |
ALL |
When you create a table, you can specify one or more columns as the sort key. Amazon Redshift stores your data on disk in sorted order according to the sort key. How your data is sorted has an important effect on disk I/O, columnar compression, and query performance.
Choose sort keys for based on these best practices:
If recent data is queried most frequently, specify the timestamp column as the leading column for the sort key.
If you do frequent range filtering or equality filtering on one column, specify that column as the sort key.
If you frequently join a (dimension) table, specify the join column as the sort key.
When you create a table, you designate one of three distribution styles: KEY, ALL, or EVEN.
KEY distribution
The rows are distributed according to the values in one column. The leader node will attempt to place matching values on the same node slice. If you distribute a pair of tables on the joining keys, the leader node collocates the rows on the slices according to the values in the joining columns so that matching values from the common columns are physically stored together.
ALL distribution
A copy of the entire table is distributed to every node. Where EVEN distribution or KEY distribution place only a portion of a table’s rows on each node, ALL distribution ensures that every row is collocated for every join that the table participates in.
EVEN distribution
The rows are distributed across the slices in a round-robin fashion, regardless of the values in any particular column. EVEN distribution is appropriate when a table does not participate in joins or when there is not a clear choice between KEY distribution and ALL distribution. EVEN distribution is the default distribution style.
Kinesis
Creating a Kinesis Stream
aws kinesis create-stream provisions a new data stream with the specified number of shards. Each shard provides 1 MB/s write and 2 MB/s read throughput. Kinesis is AWS’s real-time data streaming service, used for ingesting log data, IoT sensor readings, clickstreams, and other high-velocity data. The --profile flag specifies which AWS CLI credential profile to use.
!aws kinesis create-stream --stream-name Foo --shard-count 1 --profile adminuser
Listing Kinesis Streams
list-streams returns the names of all Kinesis streams in the specified account and region. This is useful for discovering available streams, verifying that a stream was created successfully, or scripting operations across multiple streams.
!aws kinesis list-streams --profile adminuser
Describing a Kinesis Stream
describe-stream returns detailed metadata about a stream, including its status (CREATING, ACTIVE, DELETING), the number of shards, each shard’s hash key range, and the stream’s ARN. This information is needed to configure consumers and to understand the stream’s current capacity and partitioning.
!aws kinesis describe-stream --stream-name Foo --profile adminuser
Putting a Record to a Kinesis Stream
put-record writes a single data record to the specified stream. The --data parameter accepts Base64-encoded data, and --partition-key determines which shard receives the record (Kinesis hashes the partition key to select a shard). In production, you would use the Kinesis Producer Library (KPL) for batched, high-throughput writes rather than individual CLI put commands.
!aws kinesis put-record --stream-name Foo --data "SGVsbG8sIHRoaXMgaXMgYSB0ZXN0IDEyMy4=" --partition-key shardId-000000000000 --region us-east-1 --profile adminuser
Getting Records from a Kinesis Stream
Reading from Kinesis is a two-step process: first obtain a shard iterator (a pointer to a position in the shard), then use that iterator to fetch records. The TRIM_HORIZON iterator type starts reading from the oldest available record. Other types include LATEST (newest records only) and AT_TIMESTAMP (records from a specific time). The iterator expires after 5 minutes, so consumers must continuously request new ones.
!SHARD_ITERATOR=$(aws kinesis get-shard-iterator --shard-id shardId-000000000000 --shard-iterator-type TRIM_HORIZON --stream-name Foo --query 'ShardIterator' --profile adminuser)
aws kinesis get-records --shard-iterator $SHARD_ITERATOR
Deleting a Kinesis Stream
delete-stream permanently removes a stream and all its data. This operation is irreversible – once deleted, the data cannot be recovered. Kinesis retains records for 24 hours by default (configurable up to 365 days), so ensure you have consumed all necessary data before deleting the stream.
!aws kinesis delete-stream --stream-name Foo --profile adminuser
Lambda
Listing Lambda Functions
list-functions returns metadata about all Lambda functions in the specified region, including function names, runtimes, memory settings, and last-modified timestamps. The --max-items flag limits the response size, which is useful for paginating through accounts with many functions.
!aws lambda list-functions \
    --region us-east-1 \
    --max-items 10
Uploading a Lambda Function
upload-function deploys a new Lambda function by uploading a ZIP file containing your code and dependencies. The --role parameter specifies the IAM role that the function will assume when executing, which controls what AWS resources it can access. The --handler parameter identifies the entry point function within your code (e.g., module.function_name). Lambda functions run in a serverless environment – you pay only for the compute time consumed.
!aws lambda upload-function \
    --region us-east-1 \
    --function-name foo \
    --function-zip file-path/foo.zip \
    --role IAM-role-ARN \
    --mode event \
    --handler foo.handler \
    --runtime nodejs \
    --debug
Invoking a Lambda Function Asynchronously
invoke-async triggers the Lambda function without waiting for it to complete. The --invoke-args parameter passes the input payload (here, from a file). Asynchronous invocation is used when the caller does not need the immediate result – Lambda queues the event and processes it in the background. Failed invocations are automatically retried twice, and dead-letter queues can capture permanently failed events.
!aws lambda  invoke-async \
    --function-name foo \
    --region us-east-1 \
    --invoke-args foo.txt \
    --debug
Updating a Lambda Function Configuration
update-function-configuration modifies settings like timeout, memory allocation, environment variables, and VPC configuration without redeploying the code. The timeout (maximum 900 seconds / 15 minutes) controls how long the function can run before being forcibly terminated. Adjusting these settings is a common tuning step when optimizing Lambda function performance and cost.
!aws lambda update-function-configuration \
   --function-name foo  \
   --region us-east-1 \
   --timeout timeout-in-seconds \
Getting Lambda Function Configuration
get-function-configuration returns the function’s current settings – runtime, handler, timeout, memory, IAM role, environment variables, and last update timestamp. This is useful for auditing deployed functions, comparing configurations across environments (dev/staging/production), and scripting configuration management.
!aws lambda get-function-configuration \
    --function-name foo \
    --region us-east-1 \
    --debug
Downloading Lambda Function Code
get-function returns both the configuration metadata and a presigned S3 URL that you can use to download the function’s deployment package (ZIP file). The presigned URL is temporary and expires after a few minutes. This is useful for inspecting deployed code, creating backups, or migrating functions between accounts.
!aws lambda get-function \
    --function-name foo \
    --region us-east-1 \
    --debug
Adding an Event Source to Lambda
add-event-source connects a Lambda function to an event stream (here, a Kinesis stream) so that the function is automatically invoked whenever new records arrive. The --batch-size parameter controls how many records are passed to each function invocation. This serverless pattern – Kinesis to Lambda – is a common architecture for real-time data processing, where Lambda functions transform, filter, or route streaming data without managing any servers.
!aws lambda add-event-source \
    --region us-east-1 \
    --function-name ProcessKinesisRecords \
    --role invocation-role-arn  \
    --event-source kinesis-stream-arn \
    --batch-size 100
Adding Resource-Based Permissions to Lambda
add-permission grants another AWS service (here, S3) the ability to invoke a Lambda function. This is a resource-based policy that allows the specified principal to call lambda:InvokeFunction. The --source-arn and --source-account parameters restrict the permission to a specific S3 bucket, preventing unauthorized invocations. This permission model is how you wire S3 events (like file uploads) to trigger Lambda functions.
!aws lambda add-permission \
    --function-name CreateThumbnail \
    --region us-west-2 \
    --statement-id some-unique-id \
    --action "lambda:InvokeFunction" \
    --principal s3.amazonaws.com \
    --source-arn arn:aws:s3:::sourcebucket \
    --source-account bucket-owner-account-id
Checking Lambda Policy Permissions
get-policy returns the resource-based policy (JSON document) attached to a Lambda function. This policy lists all principals that have been granted permission to invoke the function and the conditions under which invocation is allowed. Reviewing policies is an important security practice to ensure that only authorized services and accounts can trigger your functions.
!aws lambda get-policy \
    --function-name function-name
Deleting a Lambda Function
delete-function permanently removes a Lambda function, its configuration, and all associated versions and aliases. The function’s code package is also deleted from AWS’s internal storage. Event source mappings connected to the function will stop processing. This operation is irreversible, so ensure you have backups of the code if needed.
!aws lambda delete-function \
    --function-name foo \
    --region us-east-1 \
    --debug